How to use Shopify checkout events in Lucky Orange to find ways to gain more sales
In this article, learn the perks of using Lucky Orange’s integration with Shopify to understand customers, stop cart abandonment, increase product views, evaluate add-to-carts and more.
Using Lucky Orange gives you access to exclusive Events to track interactions throughout your store including Shopify-specific Events used to track visitors during the checkout flow. Learn more about Events here.
Lucky Orange has preloaded Shopify-specific Events to get you started. These include:
| Shopify Integration Event | Definition |
| Recording Started | A visitor has viewed your page which initiated a Session Recording |
| Searched | A visitor used your on-site search. This excludes search engines and organic search that occurs off of your site. |
| Collection Viewed | A visitor viewed a collection page. This may or may not lead directly into a Product Viewed event. |
| Product Viewed | A visitor has viewed a product. This will trigger for every product viewed. |
| Cart Item Added | A visitor added a product to their cart. This will trigger for each product added to their cart. |
| Cart Item Removed | A visitor removed a product from their cart. This will trigger for each product added to their cart. |
| Cart Viewed | A visitor viewed their cart. This occurs regardless of whether there are products within the cart. |
| Checkout Started | A visitor has started the checkout process. |
| Checkout Address Info Submitted | A visitor is in the checkout process and has submitted their mailing address. |
| Checkout Shipping Info Submitted | A visitor has supplied all the necessary contact and delivery information and has now selected a shipping rate. |
| Payment Information Submitted | A visitor has successfully submitted their payment information. |
| Checkout Contact Info Submitted | A visitor has submitted the completed checkout form. Should the payment be approved, the subsequent Event to trigger will be "Ordered.” |
| Ordered | Congrats! A visitor has successfully completed their checkout process. |
Pro tip: Make sure you mark all of these Events as Key Events for easier tracking.
Note: Shopify's privacy restrictions prevent non-Shopify Plus merchants from viewing Session Recordings or Dynamic Heatmaps of visitors on the checkout page. We have you covered – Lucky Orange provides an alternative method through checkout-specific Events, bolded in the chart above, which allows you to track the visitor's journey throughout the checkout process. Click here to learn more about this policy.
Shopify Plus merchants can access checkout data automatically once Lucky Orange is installed. Click here to learn more.
Read on to see how Lucky Orange helps you monitor visitors in all stages of the checkout flow though:
- Dashboard
- Visitors
- Session Recordings
- Visitor Profiles
- Conversion Funnels
- Surveys
- Announcements
- Chat Invites
- Event Manager and Log
Track Purchases & Adds to Cart in Dashboard
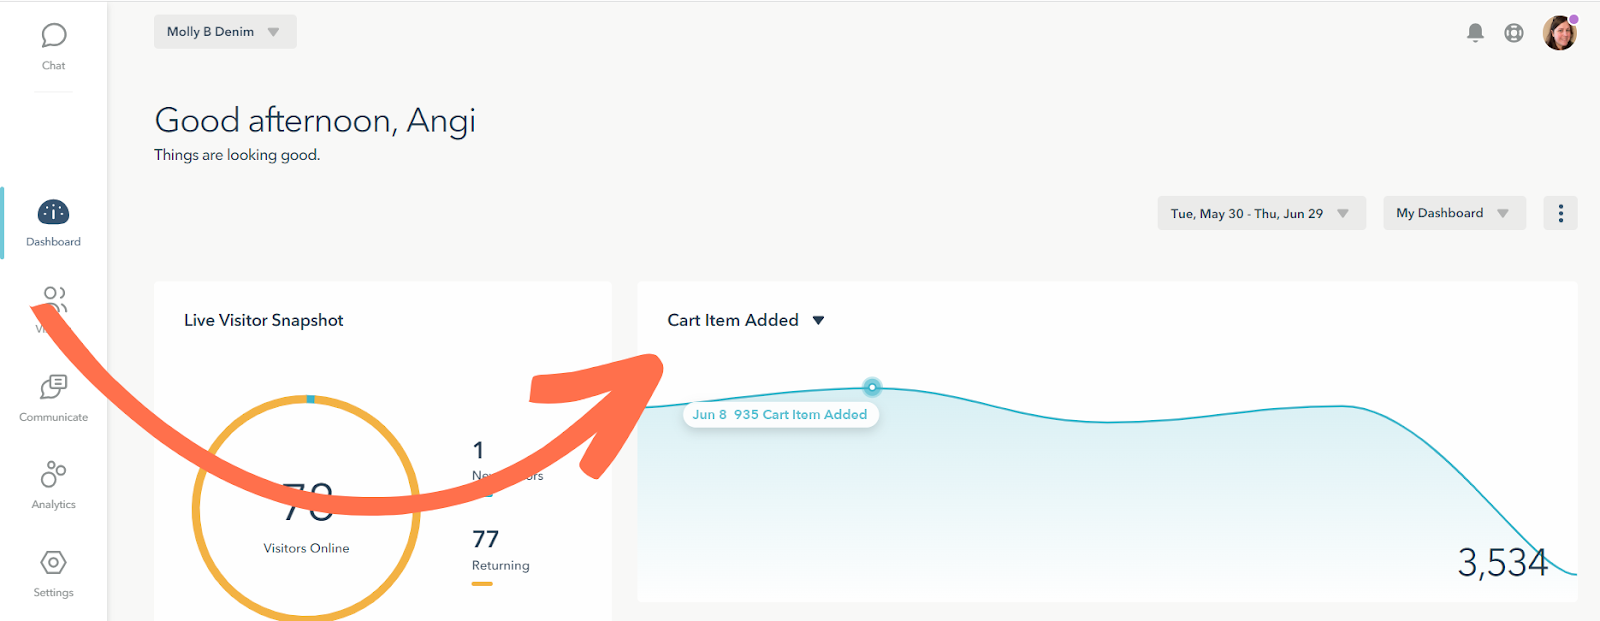
The Dashboard is your mission control center, and you can track all of the Shopify integration Events mentioned above. These Shopify-specific Events can be monitored directly from the Dashboard through an Events dashcard include:
- Cart Item Added
- Cart Item Removed
- Cart Viewed
- Checkout Address Info Submitted
- Checkout Contact Info Submitted
- Checkout Shipping Info Submitted
- Checkout Started
- Collection Viewed
- Ordered
- Payment Information Submitted
- Product Viewed
- Recording Started
- Searched
If you want a step-by-step guide on how to add a card to your dashboard, you can learn more here.
Spot abandoned carts in Visitors
 Use the Visitors to jump into Session Recordings to watch what happened for visitors who abandoned their carts. To spot visitors who abandoned checkout with a full cart, we recommend customizing your table to include these columns:
- Name
- Date/time
- Device
- Key Event
- Cart Overview
- Item Count
- Total_Price
- Total_Discount (if offers are made)
Learn how to add columns to Visitors here.
In Visitors, you can use Optimizable Segments to use pre-set combinations of filters to sift through your recordings. This includes those people who are frustrated, confused and more. Click here to learn how to combine Optimizable Segments with other filters, including Events, Visited Page and Device type to find those people who struggled to checkout.
Here’s an exercise to try to identify possible causes of cart abandonment:
- Navigate to Visitors from the left navigation
- Use the Segments drop-down located in the upper left corner of the table to select Frustrated Visitors. The table will update automatically to include the sessions that triggered frustration events (rage click, shaky mouse).
- Open the filter drawer and select Events. Add these parameters:
- WITH Checkout Started
- WITHOUT Checkout Contact Info Submitted
Pro tip: Click the Save Segment button at the bottom of the filter drawer to find visitors that meet these criteria without having to redo your filters each time. Your new saved segment will appear in the Segments dropdown.
From here you can see sessions where visitors started to check out but didn’t finish. Additional filters can be added to identify possible issues with mobile, location and more.
Watch Session Recordings to see what happened before and after checkout
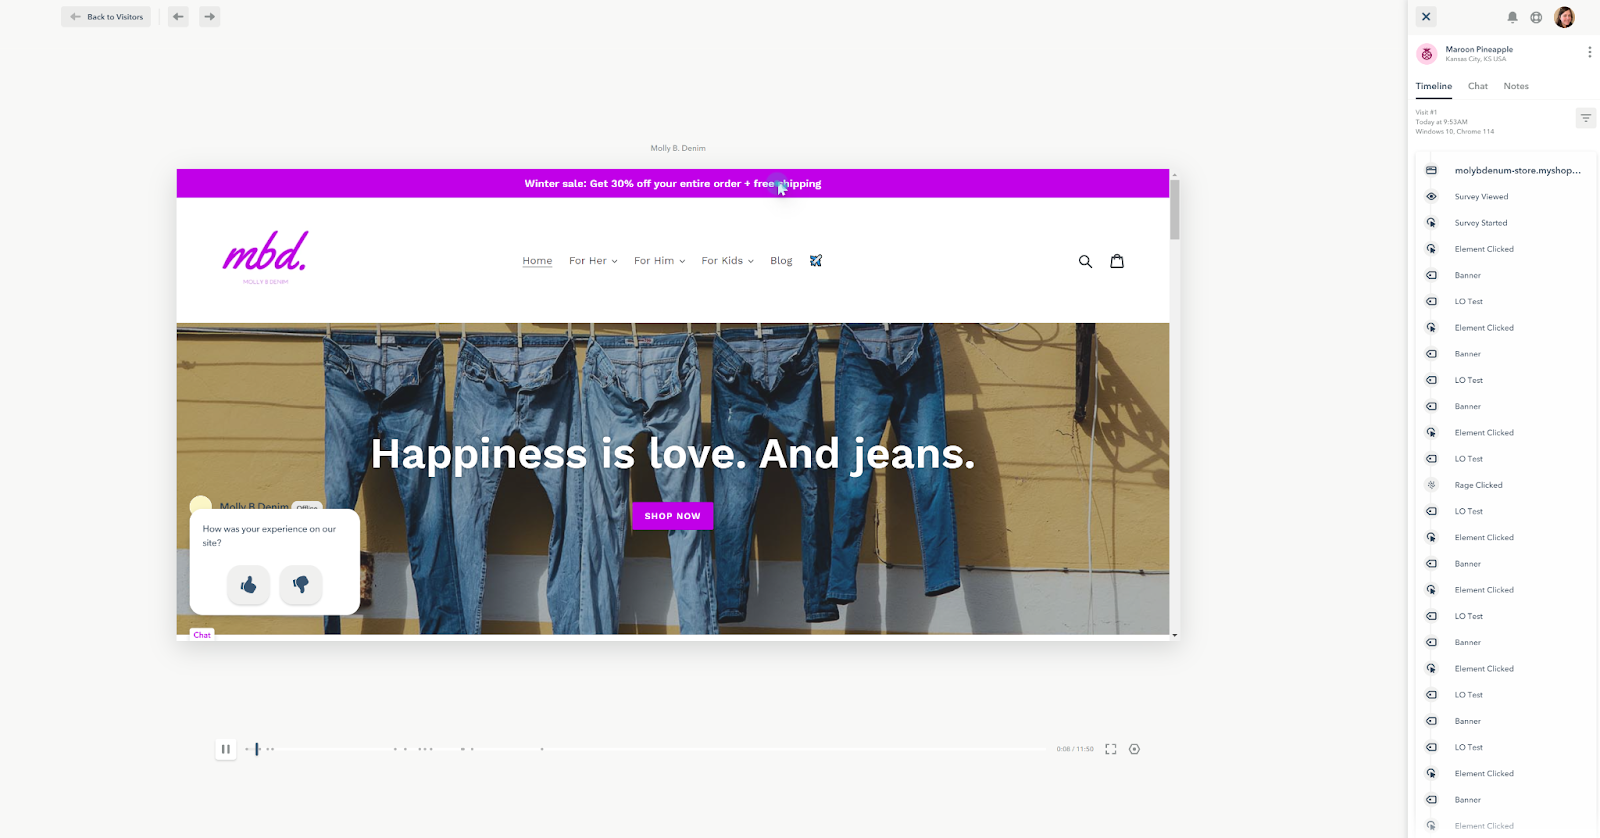
Spot things in a session recording such as:
- What information are visitors seeking prior to checkout? What about after they abandoned their checkout process?
- Do visitors hesitate on any details such as a coupon code or text that includes shipping? Could you make this information easier to understand?
- How long do they spend on your site before moving to checkout? Should you consider adding a Chat Invite to proactively address any questions?
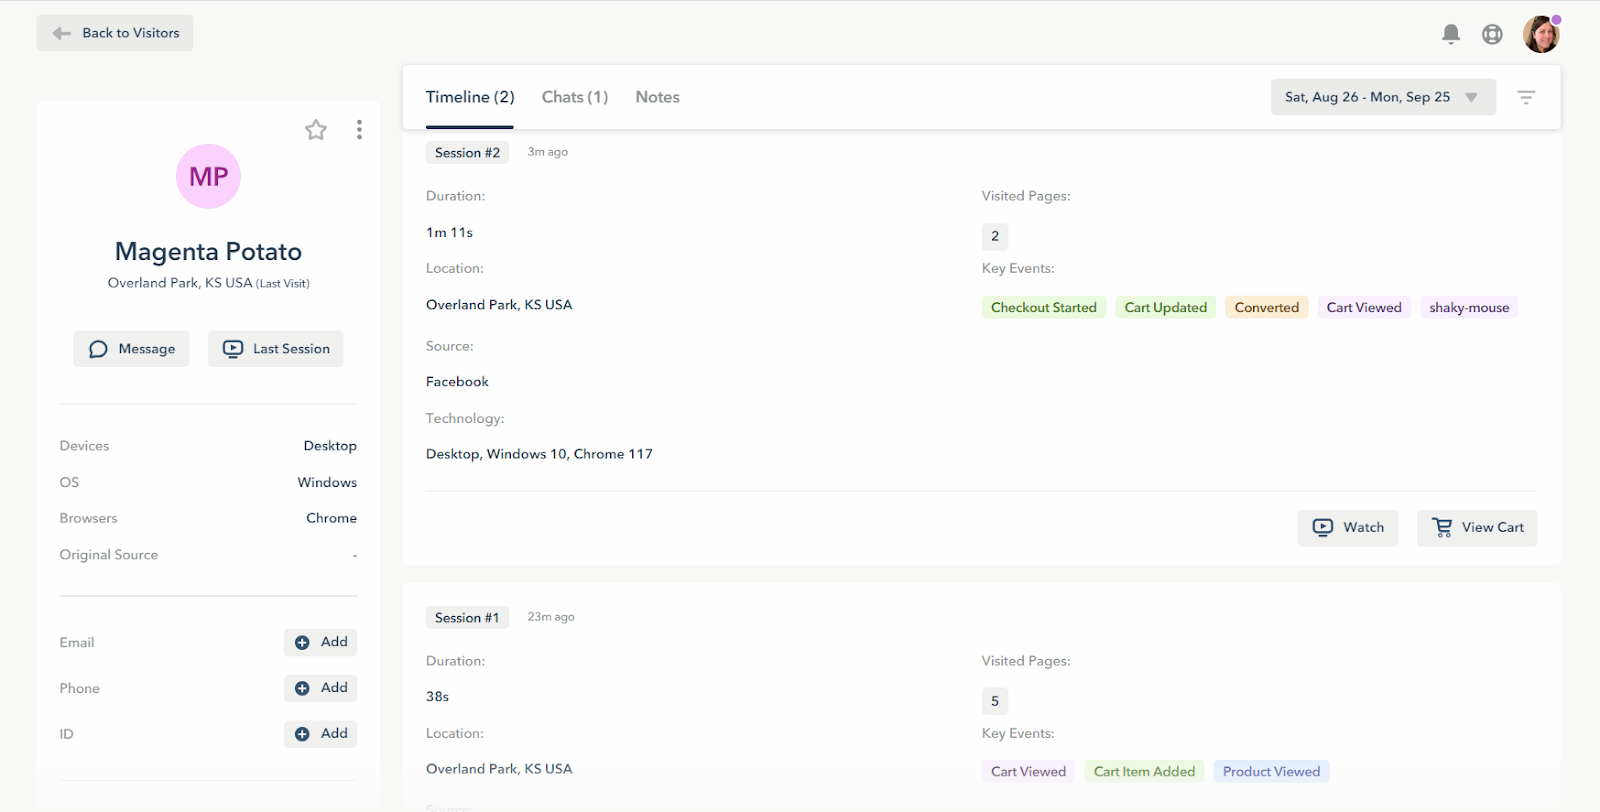
Dive into Visitor Profiles for customer-level data
You can open a Visitor’s Profile from the Visitors’ Table, a Session Recording or Chat to see granular, session-specific data on your visitors and customers. For reference, visitors that have not yet passed in information, such as a name or email address, will be displayed as a unique identifier like Cobalt Melon or Teal Banana.
Visitor Profiles will highlight Key Events, which can include Shopify checkout Events such as:
- Checkout Address Info Submitted
- Checkout Contact Info Submitted
- Checkout Shipping Info Submitted
- Checkout Started
- Ordered
- Payment Information Submitted
You can quickly see which Key Events occurred during each Session. For example, you could see Magenta Potato Added items to their cart on Session #1 and started to checkout. On Session #2, you can see they completed the checkout at which point the customer will now be known to you.
Click here to learn more about Visitor Profiles.
Find trouble spots with Conversion Funnels
Conversion Funnels help you identify pre-defined journeys through your website to see where visitors drop off. Shopify users will see a pre-built funnel in Lucky Orange that follows visitors through this journey:
- Step 1: Product Viewed
- Step 2: Cart Item Added
- Step 3: Ordered

You can create unlimited conversion funnels that can include Events or URLs. Add these Events and URLs to your default Conversion Funnel or create a new one. Learn more about setting up Conversion Funnels here.
Here are two additional Conversion Funnels steps you can use with Shopify checkout events to pinpoint causes of visitor drop off.
Step Recommendations: Checkout Started
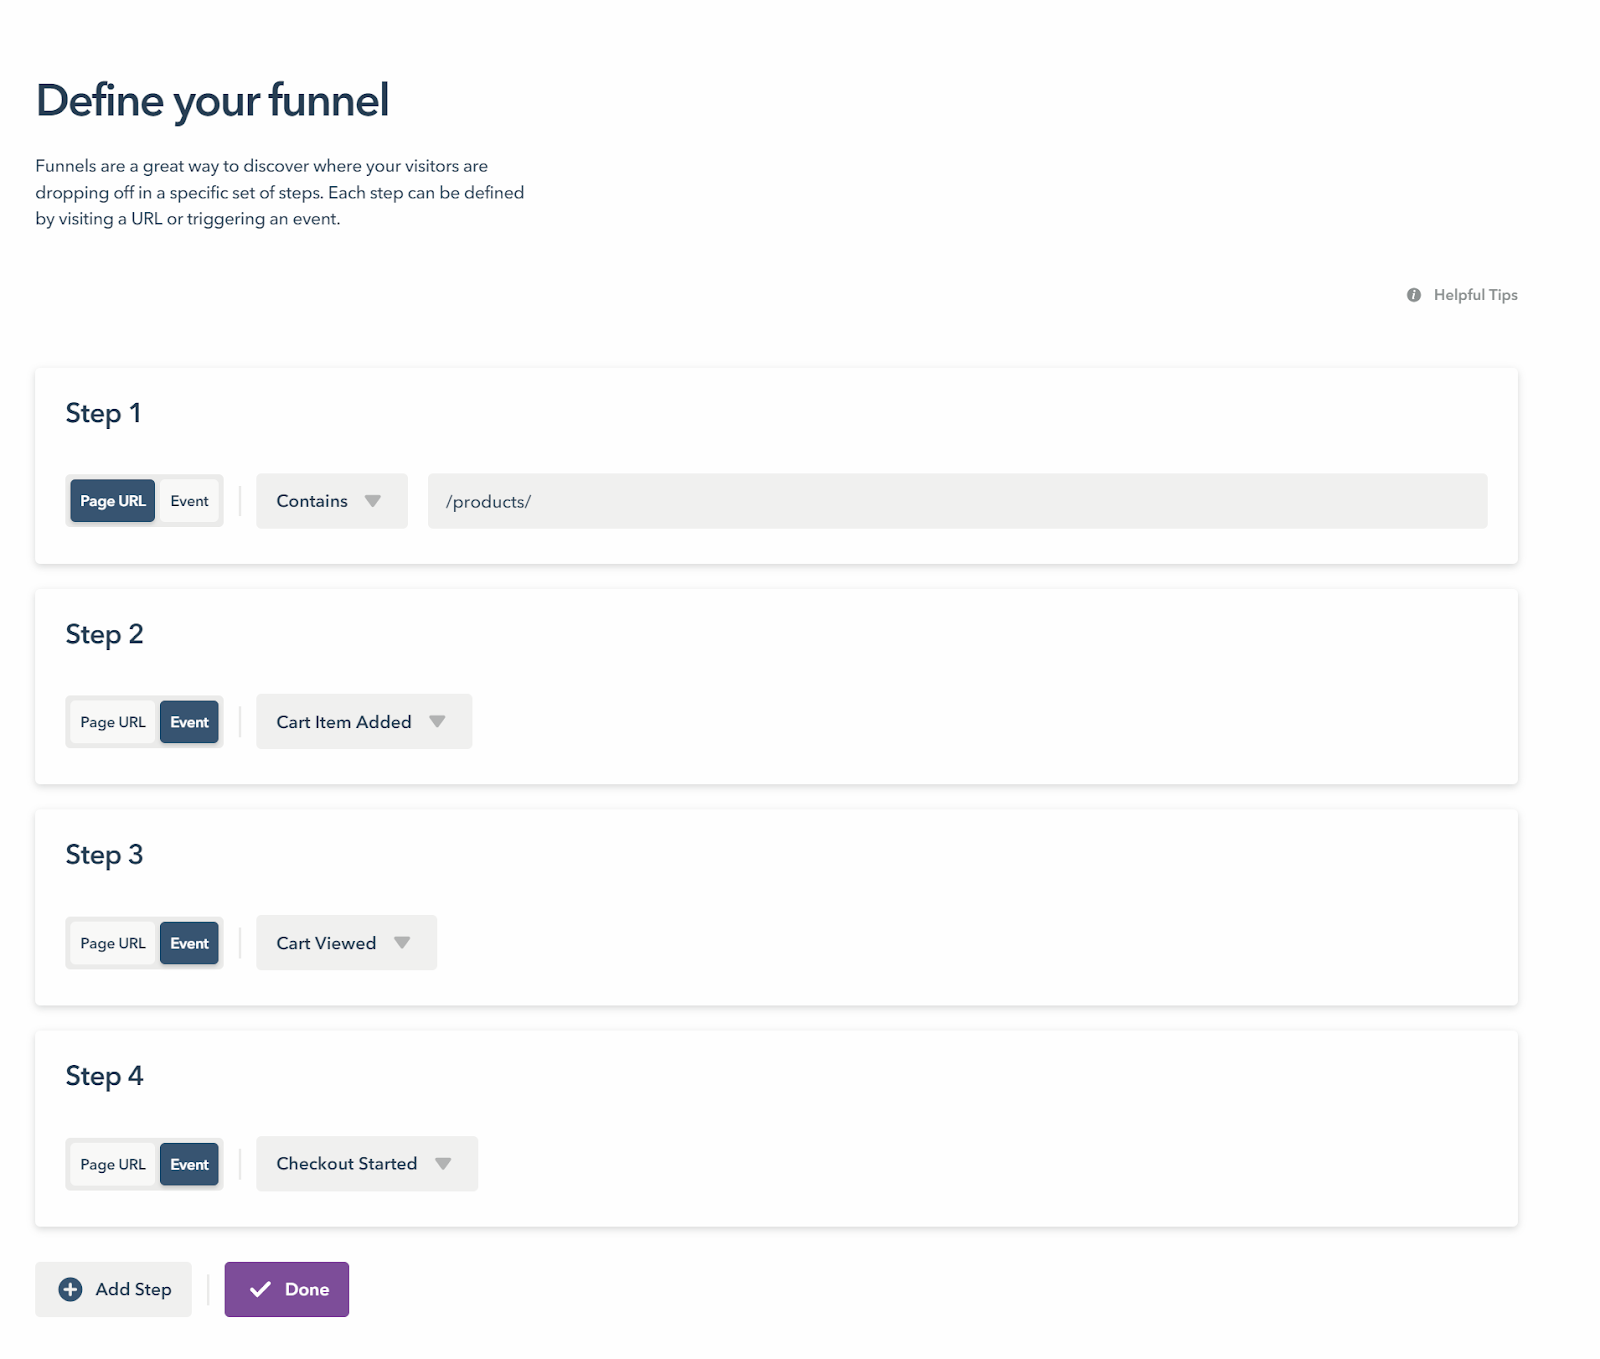
- Step 1: Page URL contains /products
- Step 2: Event: Cart Item Added
- Step 3: Event: Cart Viewed
- Step 4: Event: Checkout Started
Step Recommendations: Checkout Flow
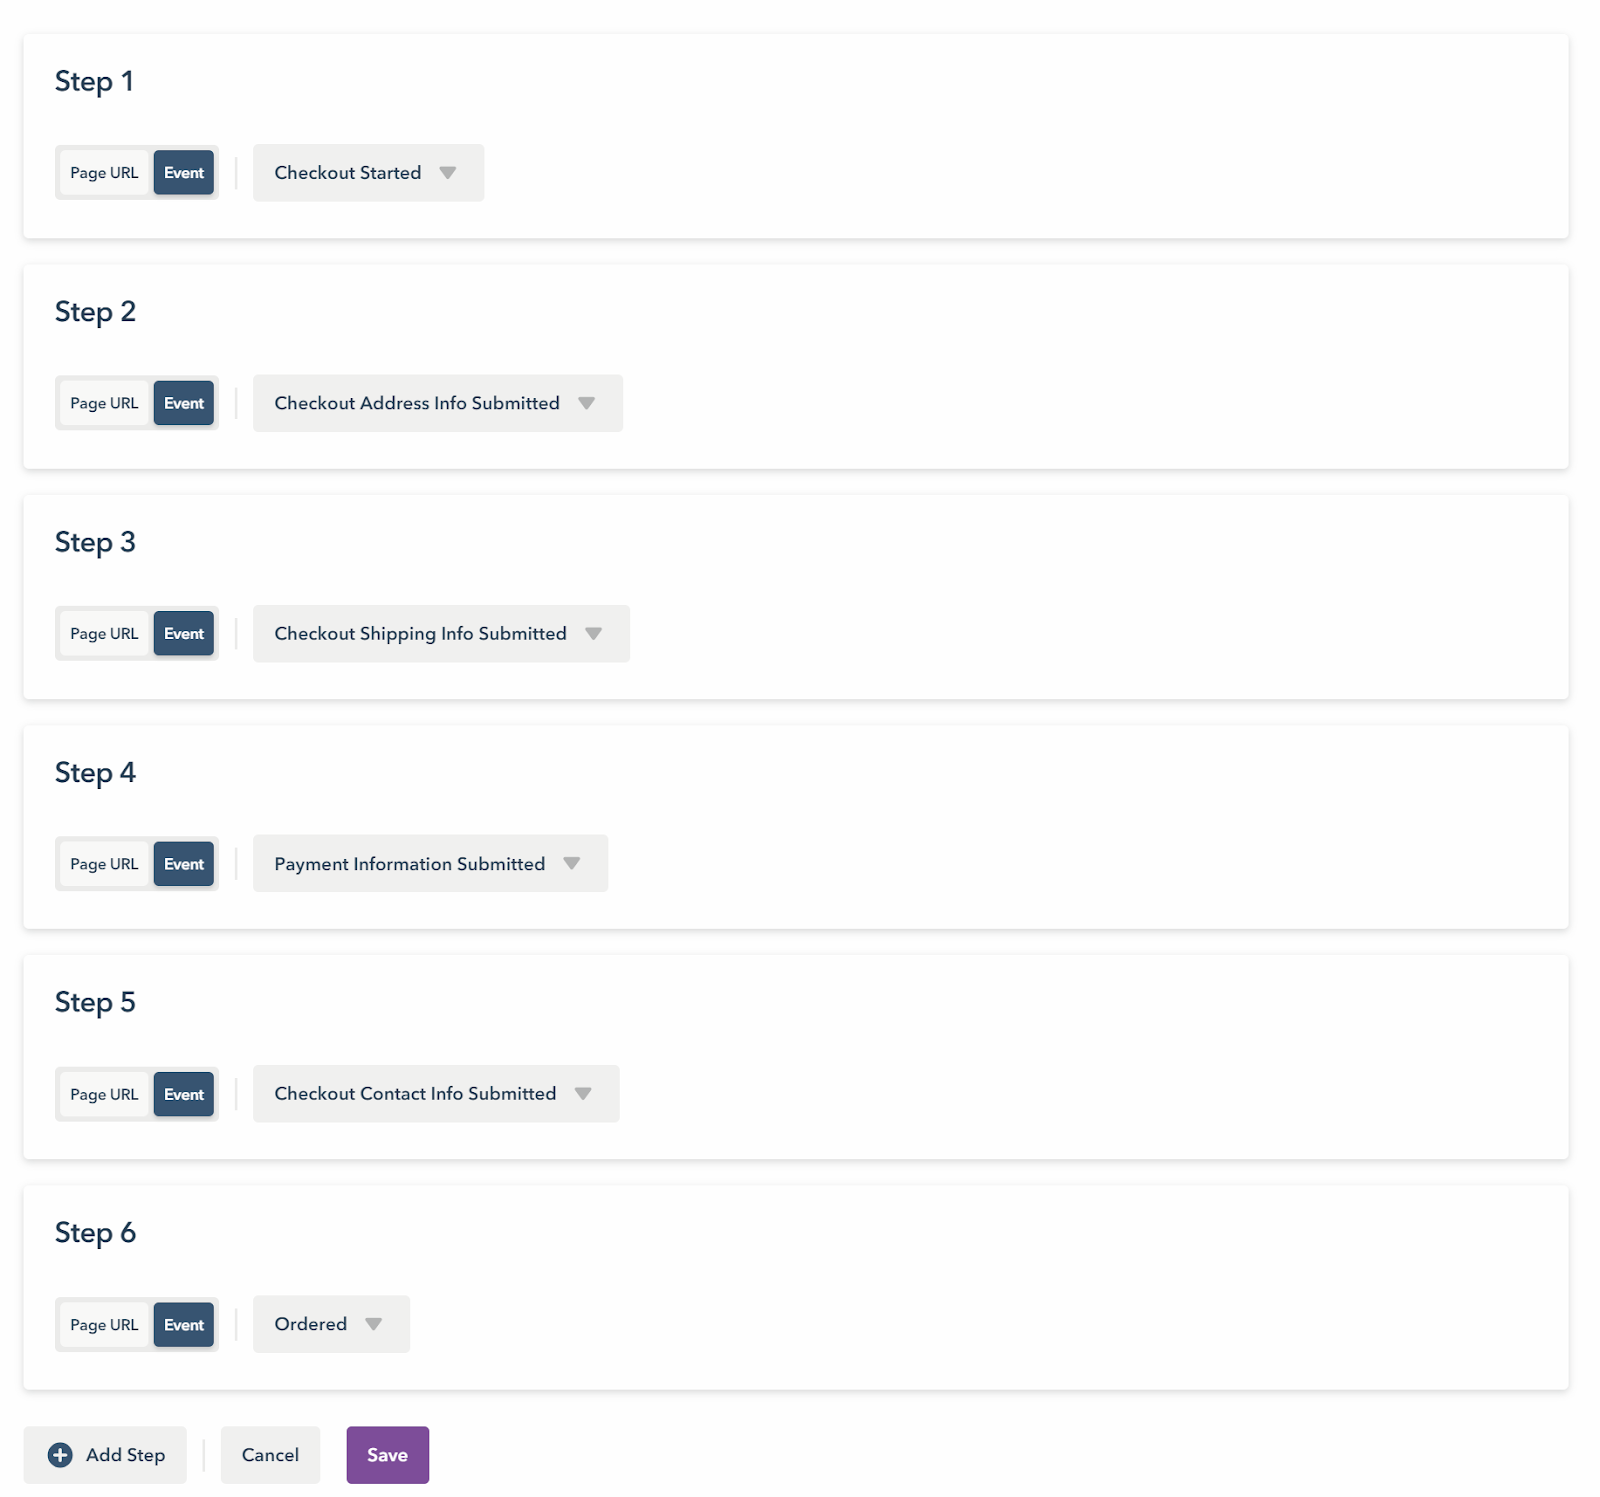
- Step 1: Event: Checkout Started
- Step 2: Event: Checkout Address Info Submitted
- Step 3: Event: Checkout Shipping Info Submitted
- Step 4: Event: Payment Information Submitted
- Step 5: Event: Checkout Contact Info Submitted
- Step 6: Event: Ordered
Use Surveys to find out why someone didn’t finish checking out
A Survey lets you ask people on your website questions to gain feedback, learn about their preferences and more. You can use Shopify checkout events to trigger surveys but note they won’t show on the actual checkout page. For example, you might want to trigger a survey based on the Checkout Event Started and trigger it to show on any page outside of checkout so the visitor would see it if they left the checkout flow.
To run a Survey, you need to complete five steps:
- The type of Survey: Select from one of four Survey types
- Survey question(s): Select from a single question or multiple questions. If you select multiple questions, you can also include an invitation that will show prior to the Survey.
- Triggers: Determine who will see the Survey in addition to where and when it will be shown. Recommended triggers to specifically target people who started but didn’t complete checkout are included below.
- Delivery: Select how long it will run on your Shopify store
- Review: Finalize and launch the Survey
Want to learn more about creating a Survey? Click here for step-by-step instructions.
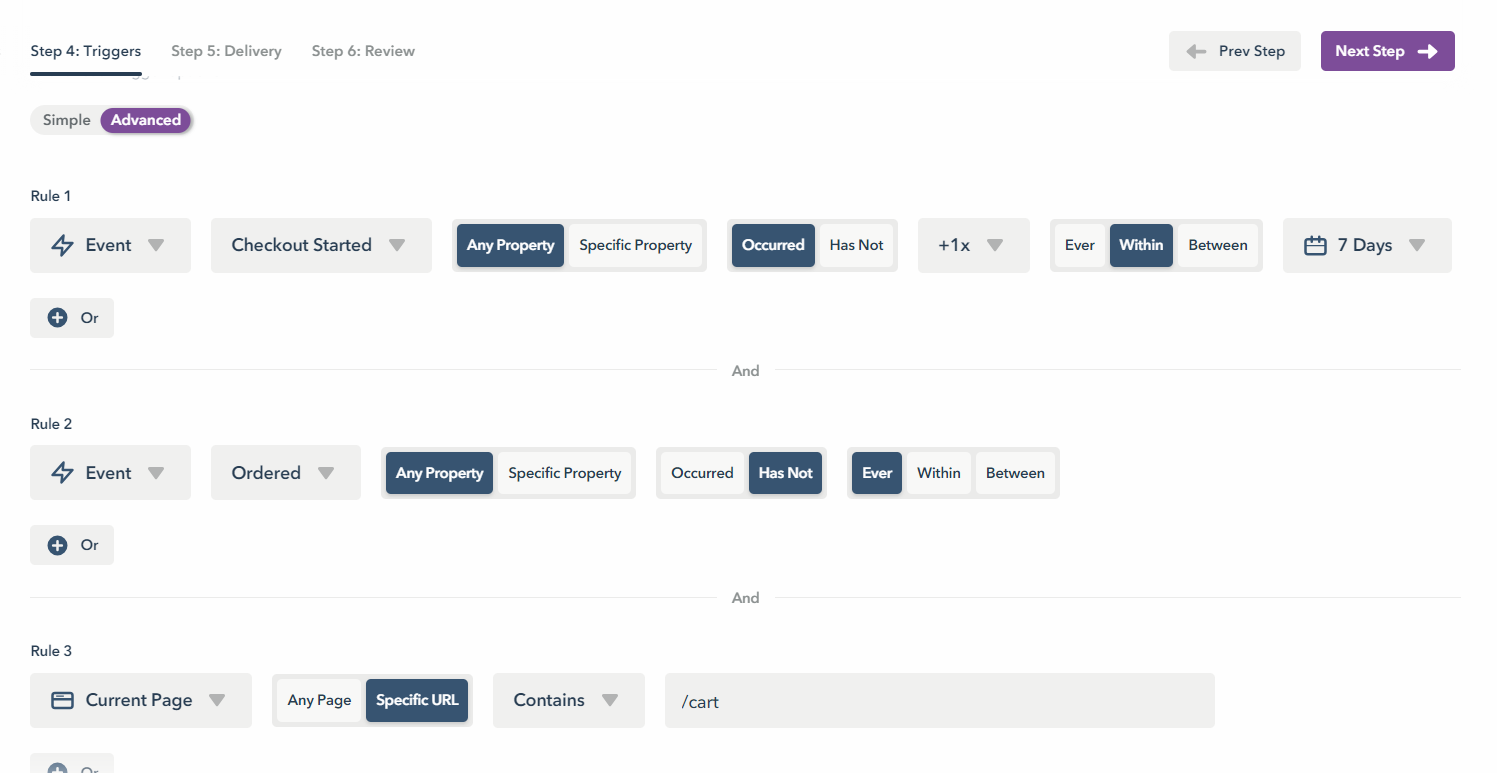
Recommended triggers to specifically target people who entered but didn’t complete the checkout flow include:
Rule #1: Event Checkout Started - Any property - Occurred - +1x - within 7 days
We’ve limited this to at least once within 7 days to grab people who are more engaged. You can use “ever” to expand it to anyone who started to checkout before clearing their cookies or their cookies expired.
AND Rule #2: Event Ordered - Any Property - Has Not - within 7 days
This will expand our Rule #1. To trigger someone would have had to begin checking out but didn’t complete the order. You want to match the date parameters with Rule #1 (in this case, within 7 days).
AND Rule #3: Current Page - Specific URL - Contains - /cart
This rule would trigger the Survey to people who don’t complete the checkout process and then returned to the shopping cart. You can modify this to include “Any page” or additional pages (under the “OR” condition within the same rule). Confused by what AND or OR mean? Read more here.
Tip: If using “Any page” instead of a specific page, we recommend adding an additional AND Rule #4 to include a 3-5 second time delay. This will keep the visitor from being bombarded upon their return.
Trigger Announcements to address common checkout questions
An Announcement lets you get important information, such as shipping information or a discount code, directly in front of your visitors. Using triggers, you can focus on showing this information when they need it most - before checkout.
You can also use Shopify checkout events as triggers for Announcements. Like Surveys, Announcements can’t display on the actual checkout page due to Shopify’s checkout page policy.
These checkout Events include:
- Checkout Started
- Checkout Address Info Submitted
- Checkout Shipping Info Submitted
- Payment Information Submitted
- Checkout Contact Info Submitted
- Ordered
For example, you could trigger an Announcement based on Event “Checkout Started” occurring and the Event Checkout “Checkout Shipping Info Submitted” not occurring. This could show on any page or a specific page outside of checkout when they return to your store for more information.
This would be helpful in promoting a free shipping discount code.
To run an Announcement, you need things:
- The type of Announcement: Select from two available types with varying levels of interruption for visitors
- Announcement category: Select three Announcement categories
- Content: This includes a headline, supporting text, image and primary button action
- Triggers: They determine who will see the Announcement in addition to where and when it will be shown.
- Delivery: Select how long it will run on your Shopify store
- Review: Finalize and launch the Announcement
Click here for step-by-step instructions for creating an Announcement.
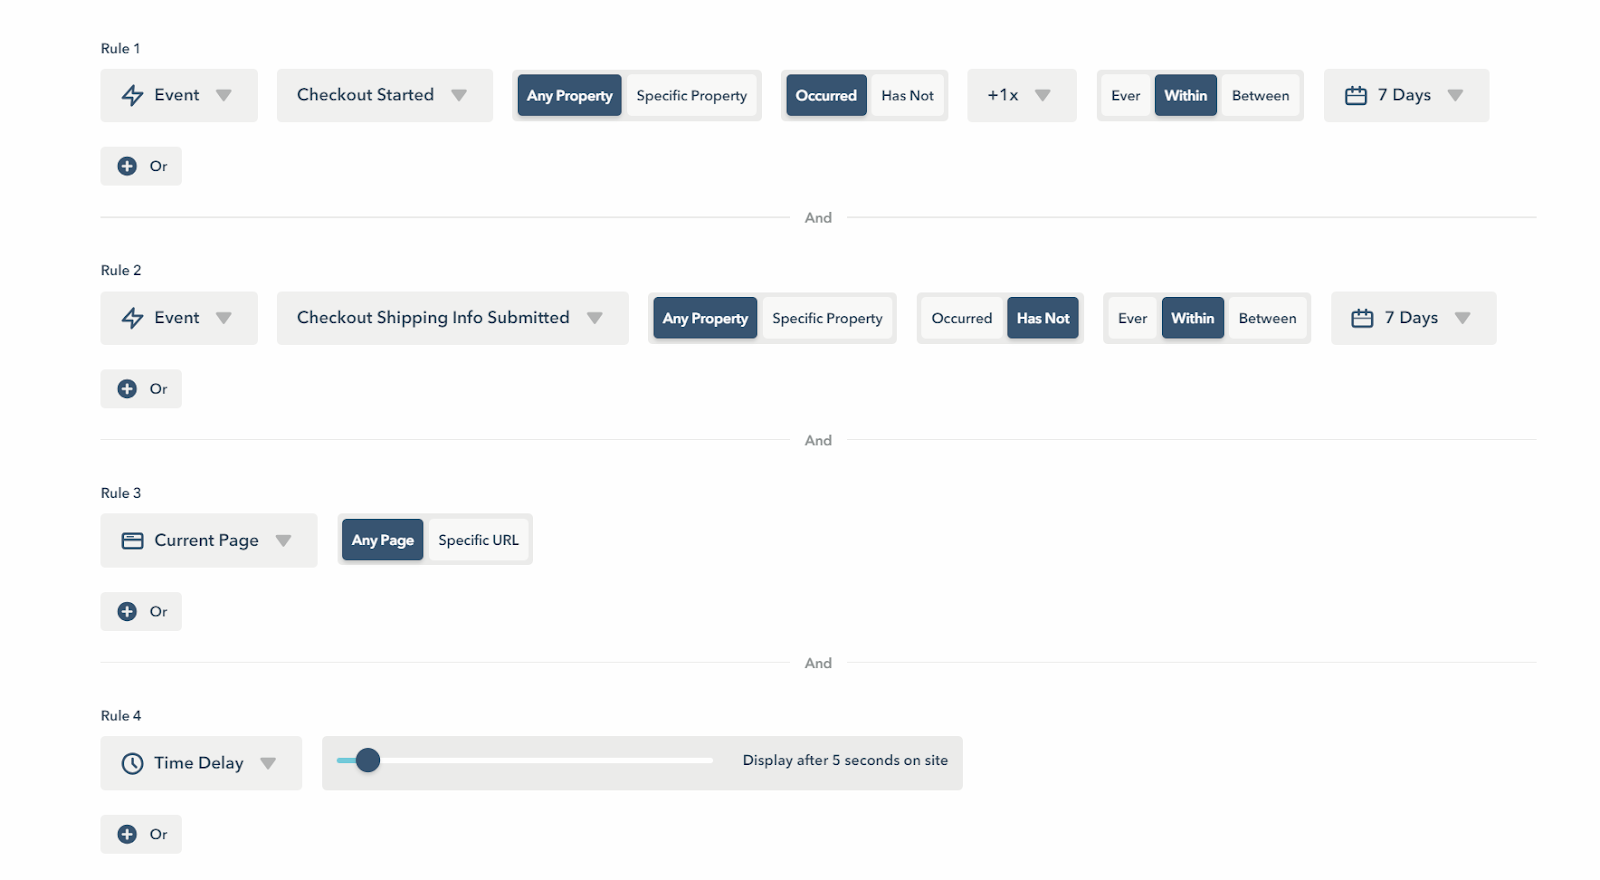
Here are recommended triggers to show the Announcement to people who stopped before selecting a shipping method. This can be a common block within checkout, especially if shipping costs aren’t communicated clearly prior to check out. Confused by what AND or OR means? Read more here.
These triggers are located under Advanced:
Rule #1: Event “Checkout Started” - Any property - Occurred - +1x - within 7 days
We’ve limited this to at least once within 7 days to grab people who are more engaged. You can use “ever” to expand it to anyone who started to checkout before clearing their cookies or their cookies expired.
AND Rule #2: Event “Checkout Shipping Info Submitted” - Any Property - Has Not - within 7 days
This will expand our Rule #1. To trigger someone would have had to begin checking out but didn’t select a shipping method. You want to match the date parameters with Rule #1 (in this case, within 7 days).
AND Rule #3: Current Page - Any page
This rule would trigger the Announcement to people who started the checkout process but didn’t select a shipping method (Rules #1 and #2). The announcement will show on any page that they then return to.
AND Rule #4: Time Delay - 5 seconds
Lastly, this rule puts a little space between the visitor landing on your website after leaving checkout and seeing the announcement. This keeps the visitor from being bombarded upon their return.
Set Chat Invites to answer checkout questions before visitors leave your site
Chat Invites let you proactively invite someone to Chat with you before they can leave the site. While this can be helpful when used before someone checkout to anticipate their hesitations, it can also be used to approach visitors who started to checkout but ultimately left before completing it.
Shopify checkout Events include:
- Checkout Started
- Checkout Address Info Submitted
- Checkout Shipping Info Submitted
- Payment Information Submitted
- Checkout Contact Info Submitted
- Ordered
These are just some of the Shopify-specific Events that are available to Shopify users. Due to Shopify’s checkout page policy, we can’t show Session Recording or Dynamic Heatmaps to people on the checkout page. While you won’t be able to use a Chat Invite on the checkout page itself, you can use the Shopify checkout Events, listed above, to trigger the invites.
For example, someone could have started to checkout, completed all the necessary information but stopped before submitting. You could use a Chat Invite to target someone who left the checkout process and returned to your store.
Chat Invites need four things:
- Setup, including the image/icon used, message shown in the invite and settings such as auto-hide
- Triggers to determine who sees the Chat Invite and when and where it’s shown to them
- Timing settings customize when the invite is displayed, such as if your team has to be available to chat, if it’s within your office hours or anytime.
- Review to give the Chat Invite a critique before launching or saving
Want a step-by-step guide to setting up Chat Invites? Click here to learn more.
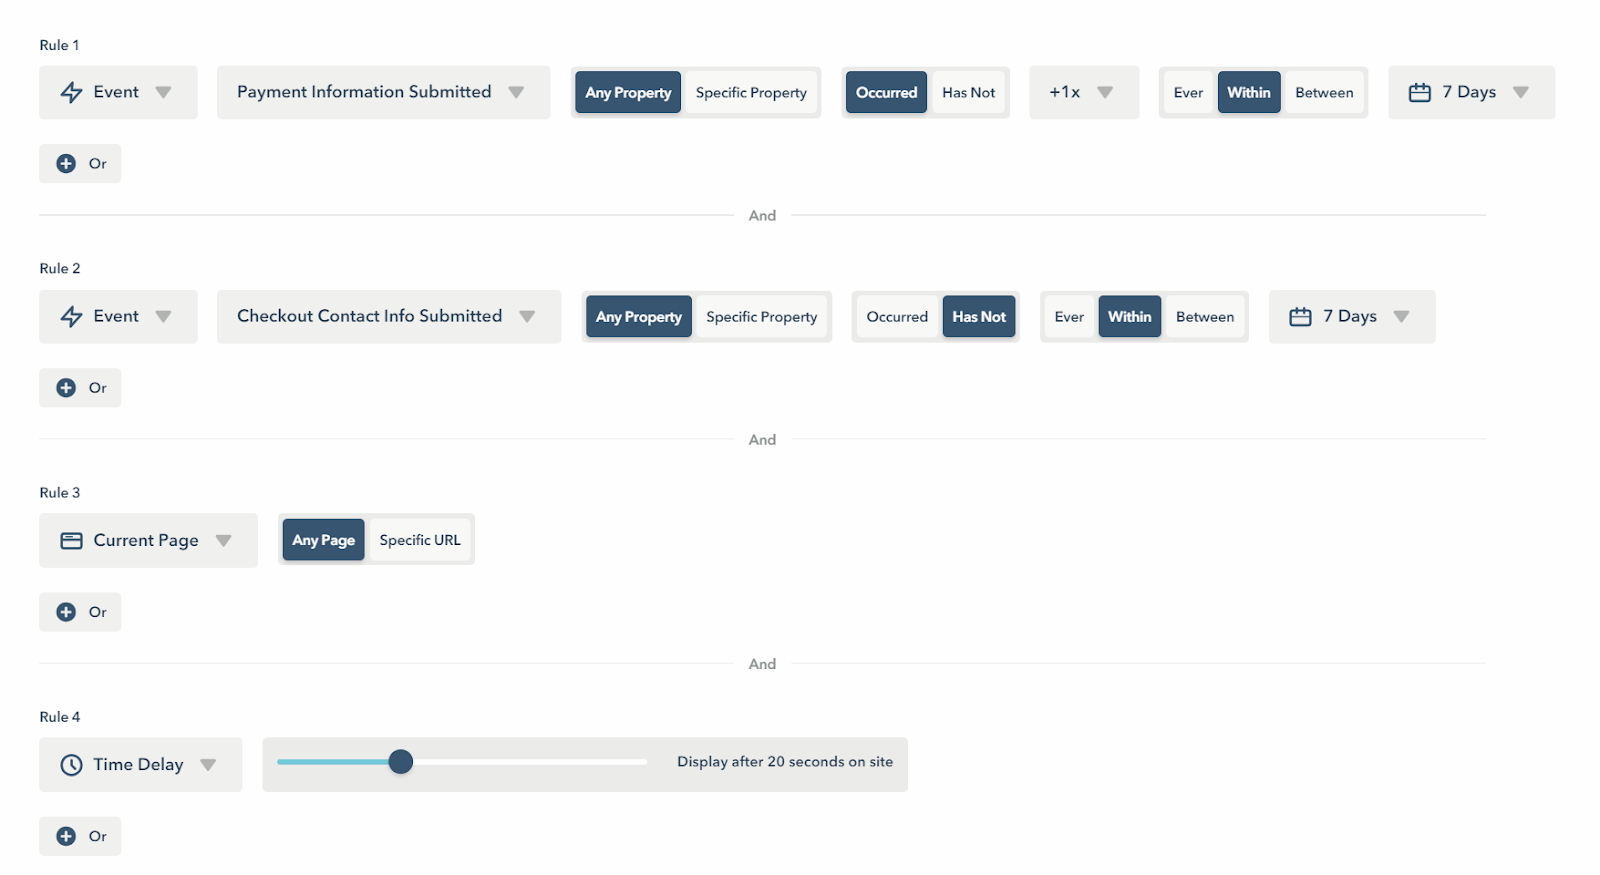
Here are recommended triggers to show a Chat Invite to people who started to checkout, completed all of the necessary information but stopped before submitting the order. This can help you understand possible reasons why they would go through the process of checking out but ultimately not submit it.
These triggers are located under Advanced.
Rule #1: Event “Payment Information Submitted” - Any property - Occurred - +1x - within 7 days
This is specifically focusing on the last step of the checkout process - the payment information. If the payment information has been submitted, the visitor is primed to checkout. We’ve limited this to at least once within 7 days to focus on your most active visitors.
AND Rule #2: Event “Checkout Contact Info Submitted” - Any Property - Has Not - within 7 days
While Rule #1 looks at people who did add their payment information, Rule #2 takes it one step further and excludes anyone who submitted information. You want to match the date parameters with Rule #1 (in this case, within 7 days).
AND Rule #3: Current Page - Any page
This rule would trigger the Chat Invite to people who started the checkout process but didn’t select a shipping method (Rules #1 and #2). The Chat Invite will show on any page that they then return to.
AND rule #4 Time Delay - 20 seconds
Lastly, this rule puts a little space between the visitor landing on your website after leaving checkout and seeing the Chat Invite. This keeps the visitor from being bombarded upon their return. Chat Invites typically have a longer time delay than Surveys or Announcements.
Confused by what AND or OR means? Read more here.
Organize and manage your checkout Events in the Event Manager and Log
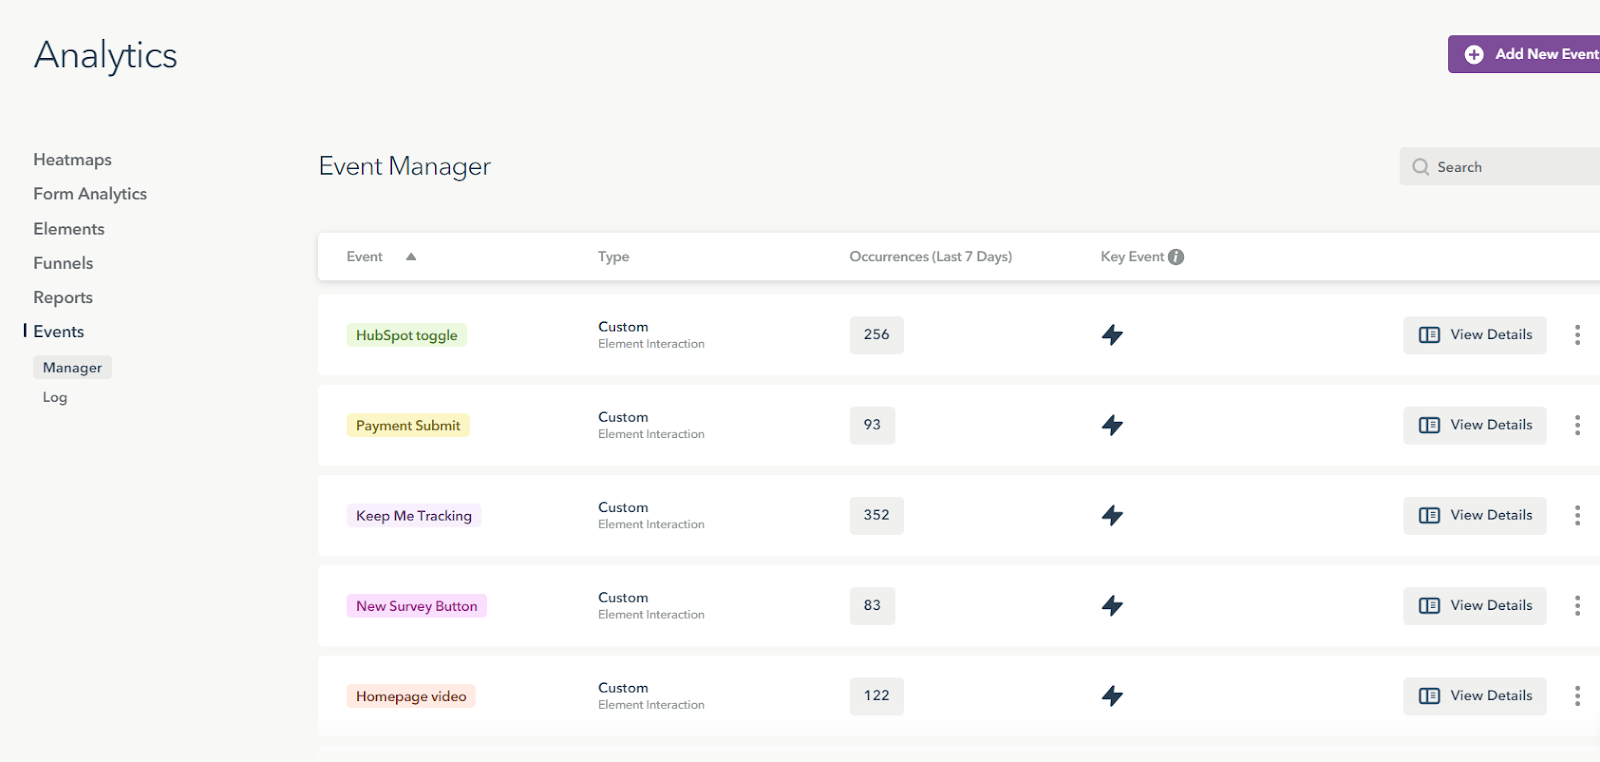
Located within Analytics, you can access all events including Shopify-specific Events that have been triggered in the Event Manager or dive into the Events Log.
Below is a comprehensive list of preloaded Shopify Events, with events specifically pertaining to Shopify's checkout flow emphasized in bold:
- Recording Started
- Searched
- Collection Viewed
- Product Viewed
- Cart Item Added
- Cart Item Removed
- Cart Viewed
- Checkout Started
- Checkout Address Info Submitted
- Checkout Shipping Info Submitted
- Payment Information Submitted
- Checkout Contact Info Submitted
- Ordered
Through these features you can:
- Mark Events as Key Events to show across the app, including Visitor Profiles and the Visitors’ Table
- Click into the Occurrence tab to jump into the Event Log to see who triggered it over the last 7 days
- Add additional Events as needed