How to use UTM parameters to link and segment visitor behavior from source to conversion
When you need to track visitors, adding UTM parameters to your campaign links opens a new world of analytics possibilities within Lucky Orange.
In this article:
- What are UTM parameters?
- Why should you use UTM parameters with Lucky Orange?
- How do you set up UTM parameters?
- How do you use UTM parameters with Segments and Events?
- How do you use UTM parameters in the Dashboard?
- How do you use UTM parameters in Visitors?
- How do you use UTM parameters in Surveys, Announcements and Chat?
- How do you use UTM parameters with Heatmaps and Funnels?
What are UTM parameters?
UTM parameters are snippets of code placed on the end of a link. Think of them like baggage tags that are placed on luggage at the airport. When used, UTM parameters tell a system like Lucky Orange the exact link someone used to get to your website or landing page, letting you dive into specific campaigns, ad sets and creative. Parameters include:
| UTM parameter | Definition | Example |
| Campaign Source | The source that referred your visit to your website | utm_source=facebook |
| Campaign Medium | The marketing channel that referred your visit to your website | utm_medium=social |
| Campaign Name | The campaign name for the content | utm_campaign=cybermonday |
| Campaign Term | The paid keywords you’re bidding on | utm_term=new-parents |
| Campaign Content | Used when A/B testing or monitoring different ad creative, links, CTAs, etc. | utm_content=ad2 |
You don’t have to be a developer to use UTM parameters. Anyone can use them. There are useful, free tools such as Google’s Campaign URL Builder or G2 Crowd’s URL Generator.
Why should you use UTM parameters with Lucky Orange?
UTM parameters let you explore visitor behavior and analytics beyond a source.
Instead of seeing “social” as your source, you can dive into what the traffic from a specific Facebook campaign and ad sets are doing on your website. Instead of seeing “Google” as your source, you can diagnose distinct PPC and CPC campaigns for efficacy and return.
By combining UTM parameters with Lucky Orange, you can:
- Create Events and segments for easier access to these target UTM parameters
- Monitor UTM parameters via Events in your Dashboard
- Filter to specific UTM parameters within the Visitors’ Table to look at all visits from those parameters
- Explore Visitor Profiles to see what UTM parameters originally brought them to your site (via Events)
- Trigger Surveys, Announcements and Chat Invites based on their UTM parameters
- Follow people from a specific UTM parameter in your Funnel
- Analyze Dynamic Heatmaps and Form Analytics by UTM parameters via Events
Read on to see how to set up UTM parameters and how to use them within Lucky Orange.
How do you set up UTM parameters?
Regardless of whether you use a free UTM parameter builder or do it manually, the process is fairly uniform across all builders and straightforward:
- Paste your website URL. This can be your landing page, blog post, homepage, etc.
- Add a Campaign Source and Campaign Medium. Both are required to generate the URL with the added parameters.
- Depending on your needs, fill in Campaign Name, Campaign Term and/or Campaign Content. These are completely optional. If you have variations of the same ad or are running different campaigns, more details will help you further evaluate your campaigns to specific creative, messaging, targeting and more.
- The generated campaign URL will automatically display at the bottom of whatever UTM parameter tool you use. Copy the link.
- Paste the link in your paid campaigns, link exchanges or partnership material
Pro tip: If you’re running multiple ads in a single campaign, be consistent with your UTM parameters. For example, let’s say you want to run a paid campaign on Facebook with ads displayed on Messenger and Audience Network.
In this case, your links would look something like this:
- Ad set 1: https://www.yourwebsite.com/?utm_source=facebook&utm_medium=messenger&utm_campaign=springsale21
- Ad set 2: https://www.yourwebsite.com/?utm_source=facebook&utm_medium=audiencenetwork&utm_campaign=springsale21
This consistency will allow for easier analysis down the road.
How do you use UTM parameters with Segments and Events?
Segments and Events both offer unique ways to monitor and track UTM parameters:
| Type | Best used to | Multiple UTM parameters? |
| Segments |
|
Because it’s based on filters, segments can be combined with several UTM parameters and other filters |
| Events |
|
While Events are typically limited to one campaign link or UTM parameter, it can be used across multiple campaigns if a UTM parameter is kept constant. In the example above, “utm_campaign=springsale21” would track all campaign links that include that specific UTM parameter. |
How to set up segments for UTM parameters

A good place to start is to add the UTM parameter as a segment. To create a segment:
- Navigate to Visitors from the left navigation
- Click on Filter, shown to the right of the Visitors’ Table
- In the filter drawer, click on UTM parameters
- Select one or more UTM parameters from Source, Medium, Term and Campaign
- Add more filters as needed
- When finished, click on the gray Save Segment button of the bottom of the filter drawer
- Enter an internal name for the segment. We recommend a specific name for easier use and searching.
- Decide the visibility
- Everyone: The segment will show to everyone on your team
- Personal: The segment will only be visible to you
- Click the purple Save button
Note: Only UTM parameters that have traffic will be available for filtering. UTM parameters that have yet to receive any clicks or traffic won’t be available. We recommend testing out your campaign links to begin generating traffic.
How to create Events for UTM parameters
Events let you keep an eye on specific links, such as UTM parameters.
- Navigate to Settings from the left navigation
- Click on Events and select Manager
- Click on the purple Add New Event button
- Select Page Visit
- Give the new Event a specific name for internal use
- Click the purple Next button
- Add the page URL:
- Contains: Paste part of a link, such as utm_medium=ppc into the field. This is ideal for UTM parameters.
- Exact: Select the desired URL from the “Select a URL” drop-down. This will automatically populated URLs with traffic for your webpages
- Click the purple Next button
- Review your Event settings
- Click the purple Save button
How to create Key Events for UTM parameters

Key Events help you identify your most important Events and will be displayed in the Visitors’ Profile. To mark an Event as a Key Event:
- Navigate to Analytics from the left navigation if you haven’t already done so
- Click on Events and select Manager
- Click the View Details button to the right of the Event if you want to set as a Key Event
- Toggle the button for Key Event. When activated, it will display in blue.
To confirm, your Event Manager will display a lightning bolt to the right of Events set as Key Events. The Event will also display in color as opposed to gray.
How do you use UTM parameters in the Dashboard?
Add one or more Event-based dashcards to your Dashboard for easy monitoring of any Event

- Navigate to the Dashboard from the left navigation
- In the upper right corner, click on the three dots
- Select Add a Card
- Click on Events
- Customize your card:
- Click on the name to change the card name
- Adjust the size of the card. This will show in the preview on the right.
- Click the toggle by “Add to other dashboards” to add this card to all of your Dashboards
- When finished, click the purple Save button
- In the Events card, select your Event from the dropdown in the upper left corner
- Drag and drop the new Event card anywhere in your Dashboard
- Repeat to monitor more than one Event at once
You can also add dashcards for Surveys and Funnels driven by UTM parameters.
How do you use UTM parameters in Visitors?
Filter and search your Session Recordings by UTM parameters in the Visitors’ Table, and use the Events to dive into a Visitor’s Profile
In the Visitors’ Table: From the Filter
- Navigate to Visitors from the left navigation
- Click on Filters, shown to the right of the Visitors’ Table
- In the filter drawer, click on UTM parameters
- Select one or more UTM parameters from Source, Medium, Term and Campaign
- Add more filters as needed
- When finished, click Done to close the filter drawer
At this point, your table will display all of the visitors who meet your filtering criteria. If no visitors are displayed, double-check the date ( shown as Today by default) or segment (shown as Everyone by default) displayed to the left above the Visitors’ Table.
In the Visitors’ Table: From segments
- Navigate to Visitors from the left navigation
- Click on Segments, located to the left above the Visitors’ Table
- Select your saved segment from the dropdown
- To edit the segment:
- Hover over any segment listed in the dropdown and click on the pencil that will show to the right of the segment
- In the filter drawer, select Add/Remove filters
- Select one or more filters you want to change, delete or add
- When finished, select the purple Review Changes button at the bottom of the filter drawer
- To add a new segment:
- Click the purple Add new segment button at the bottom of the list of segments in the dropdown
- In the filter drawer, select one or more UTM parameters and other filter choices
- Click the gray Save Segment button at the bottom of the filter drawer
- Enter an internal name for the segment
- Decide the visibility
- Everyone: The segment will show to everyone on your team
- Personal: The segment will only be visible to you
- Click the purple Save button
How do you use UTM parameters in Surveys, Announcements and Chat?
If you set up a segment based on UTM parameters as outlined in How do you use UTM parameters in Visitors, you can use that segment to trigger Surveys, Announcements and Chat Invites.
- Navigate to Communicate from the left navigation
- Begin creating your Survey, Announcement or Chat Invite
- Proceed through Step 1, which is creating the question (Survey), content (Announcements) or setup (Chat Invites)
- In Step 2: Trigger, select Advanced. By default, it will be set on Simple.
- Select Segment from the dropdown
- Click on the desired Segment from the dropdown list
- Repeat with And or OR rules for additional segments or rules
- AND: A visitor completes both/all rules. For example, the Survey, Announcement or Chat Invite would only show to the Spring21 ad set AND came from Facebook.
- OR: A visitor completes any of the set rules. For example, the Survey, Announcement or Chat Invite would show to anyone who is in the Spring21 ad set segment or came from Facebook, regardless of whether they occurred together.
- Proceed through the setup process
How do you use UTM parameters with Heatmaps and Funnels?
Follow people from a URL-based Event in your Funnel and analyze Dynamic Heatmaps and Form Analytics by Events
To define Funnel steps by UTM parameters
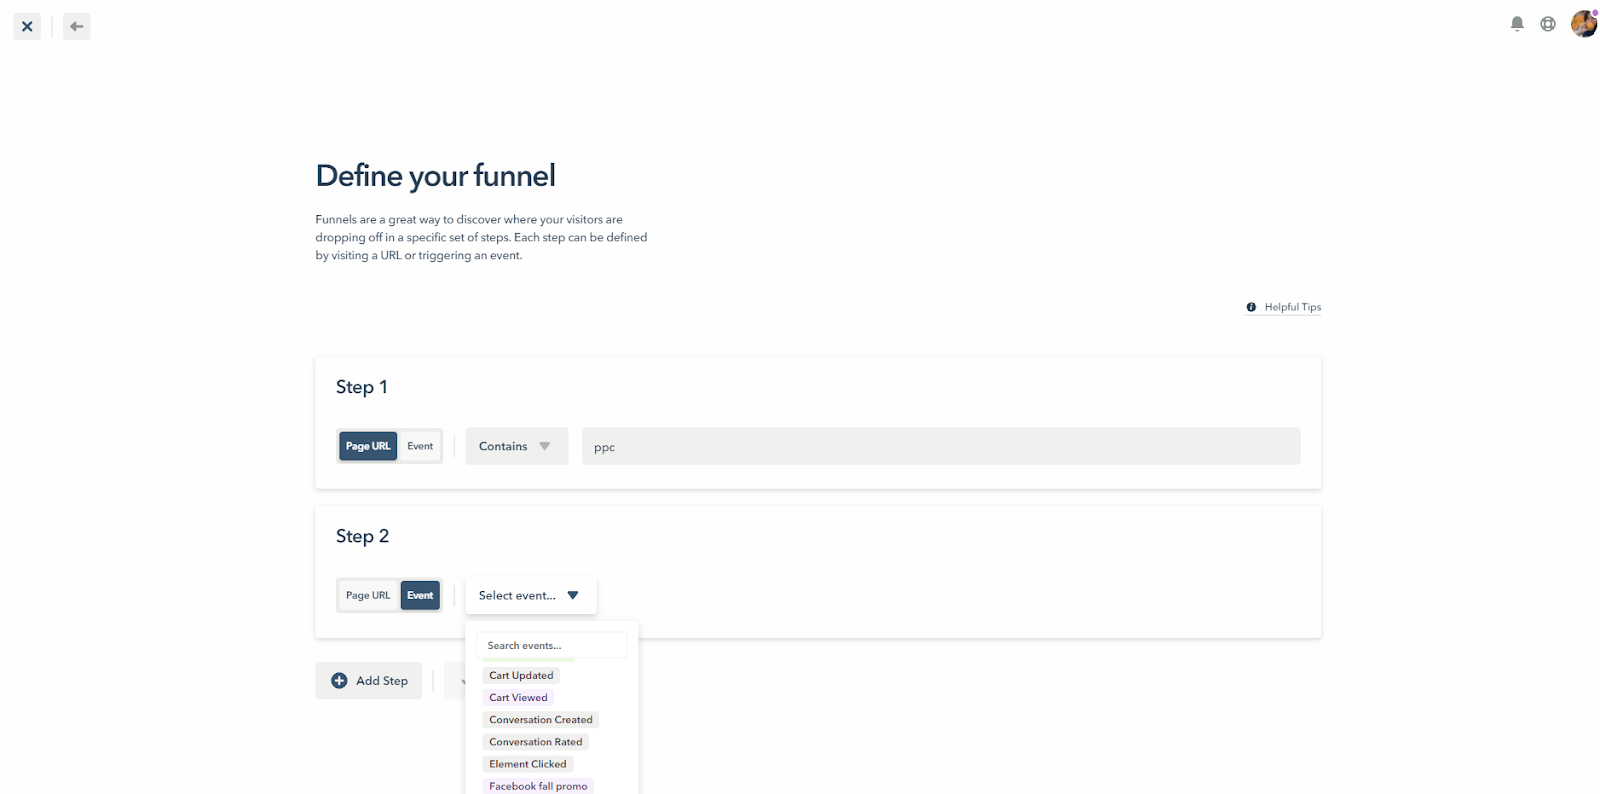
- Navigate to Analytics from the left navigation
- Select Funnels
- Click on the purple New Funnel button
- Give the Funnel a name for internal use and click the purple Next button
- Define your first two funnel steps
- By page URL:
- Contains: Paste part of a link, such as utm_medium=ppc into the field. This is ideal for UTM parameters.
- Exact: Select the desired URL from the “Select a URL” drop-down. This will automatically populated URLs with traffic for your webpages
- By Event: Click on the dropdown to see a list of your Events. Key Events will be shown in color.
- By page URL:
- Click Add Step to create additional steps in your Funnel. Two is the minimum number of steps required for a Funnel
- Drag and drop steps to arrange your Funnel Steps
- To delete a step, hover over a specific step. Click on the trash can that will show on the right
- Select the purple Done button
Your new Funnel should now display in the Funnels table.
To evaluate Dynamic Heatmaps and Form Analytics by UTM parameters

- Navigate to Analytics from the left navigation
- Select Heatmaps or Form Analytics
- Select your webpage of choice
- By default, it will show the most active pages for today. To change the date, click on the Today dropdown to the right above the table.
- By default, it will show the most active pages for everyone. To change it to most active pages by a segment, click on Everyone dropdown to the right above the table.
- Click on the magnifying glass icon, located to the right above the table, to search for specific webpages
- Click on the filter icon, located to the far right above the table, to find the most active pages based on specific behaviors including UTM parameters.
- Click on the gray Launch Heatmap or Launch Form Analytics button to the right of a page to get started
- Click on Segments in the upper left corner of the page; this is the same process for both Dynamic Heatmaps and Form Analytics.
- Select Events to open the filtering options
- Click on the dropdown to see the Events used by Visitors on this page that has the most activity.
- With: Filters for visitors who triggered the Event(s) selected
- Without: Filters for visitors who didn’t trigger the Event(s) selected
- Select Segments again to close the drawer and analyze your Dynamic Heatmap or Form Analytics.
Note: The selected Segments in the Dynamic Heatmap and Form Analytics will remain in place until you do one of the following:
- Clear the segmentation manually
- Close the browser tab/window
- Open a new Dynamic Heatmap or Form Analytics